There are many ways to simplify the schedule creation process within Paycor Scheduling. One of the ways is by utilizing the Import option available via the Schedule page. The file must be in a specific format, and can be in either CSV or Excel format. You can download our template by clicking the link at the bottom of this page. To import a schedule in a CSV or Excel format, navigate to the Schedule page, click the Options button (wrench icon), then select Import.

When the Import button is clicked, you will be presented with a field that requires the file you're attempting to upload. Click the gray Upload button first, navigate your local drive in order to find the file, then click the Upload List button as soon as the file has been selected.

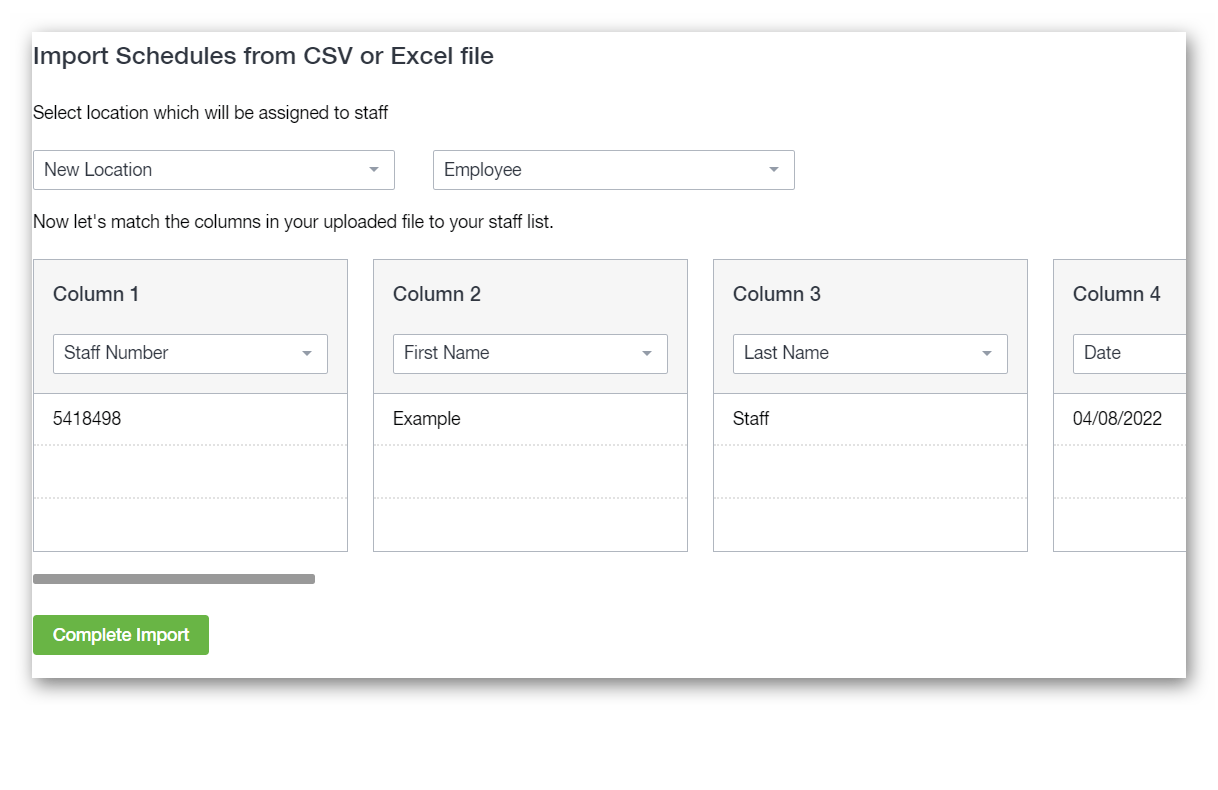
Once the Upload List button is clicked, you will be required to choose a Location, Role, and choose the correct option for each Column that correctly corresponds with the data found within that field.

Once you're finished, click the Complete Import button. The schedule import should now be in progress, and you'll be notified at the top of the page as seen in the image below:

When the upload is complete, the results will be emailed to you, successful, and failed. The email will be similar to the one below
CSV / EXCEL FORMAT
The CSV / Excel file that you will be importing should contain the following data:
-
Job Name
- Staff Number (optional)
- Department Name (optional)
- First Name
- Last Name
- Date
- Start Time
- End Time
- Break Start Time (optional)
- Break End Time (optional)
- Shift label (optional)
- Notes (optional)
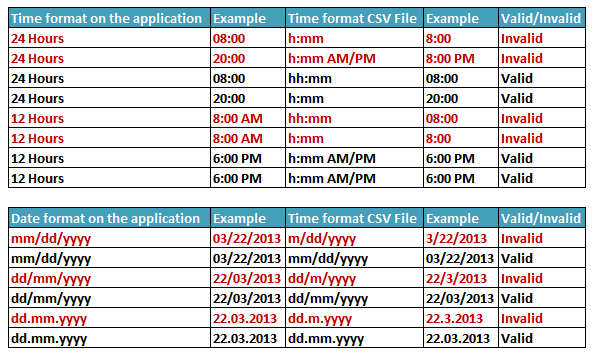
Please keep in mind that headers are mandatory. The fields in your file do not need to be in the specific order above. If your file contains more columns than is required for a successful import, you can simply skip them. Please keep in mind that if a Job, Department, or staff member does not exist within the account, they will be created automatically. Also, the date, and time, format in the CSV / Excel file must match the same format within the account. To check this, please navigate to My Account - Company Information - Localization.

For example, if the time in the account is in the 24 hours format, then you cannot use the 12 hours format when creating, editing, and importing the CSV / Excel file. Below you'll find an example of a CSV / Excel file for schedule importing purposes.

- For Column 1 (Staff Number) - Assign to Staff Number.
- For Column 2 (First Name) - Assign to First Name.
- For Column 3 (Last Name) - Assign to Last Name.
- For Column 4 (Date) - Assign to Date.
- For Column 5 (Start Time) - Assign to Start Time.
- For Column 6 (End Time) - Assign to End Time.
- For Column 7 (Job Name) - Assign to Job Name.
- For Column 8 (Department) - Assign to Department.
The following date and time formats are supported:
- For time:
- 24 Hour
- 12 Hour
- For date:
- mm/dd/yyyy
- dd/mm/yyyy
- dd.mm.yyyy
It's important for a successful schedule import that the CSV / Excel file has the correct date, and time, format. Please see the sheets below as an example:

Aside from importing a schedule, you can also export the schedule. To do so, you will want to ensure you're on the Schedule page, click the Options button (wrench icon), then choose either the PDF, CSV, or Excel file for exporting purposes.

Again, below you'll find the Schedule Import Template attachment you can download for your own personal use!
__________________________________________________________________________________

We want to hear about your great ideas. If you have a feature request, enhancement suggestion, or improvement, let us know by submitting them to to our Ideas page. Your submission can receive votes from other Paycor Scheduling users, or you can vote on ideas yourself. Simply click the ADD A NEW IDEA button below to check it out.
Cheers!

